 Save
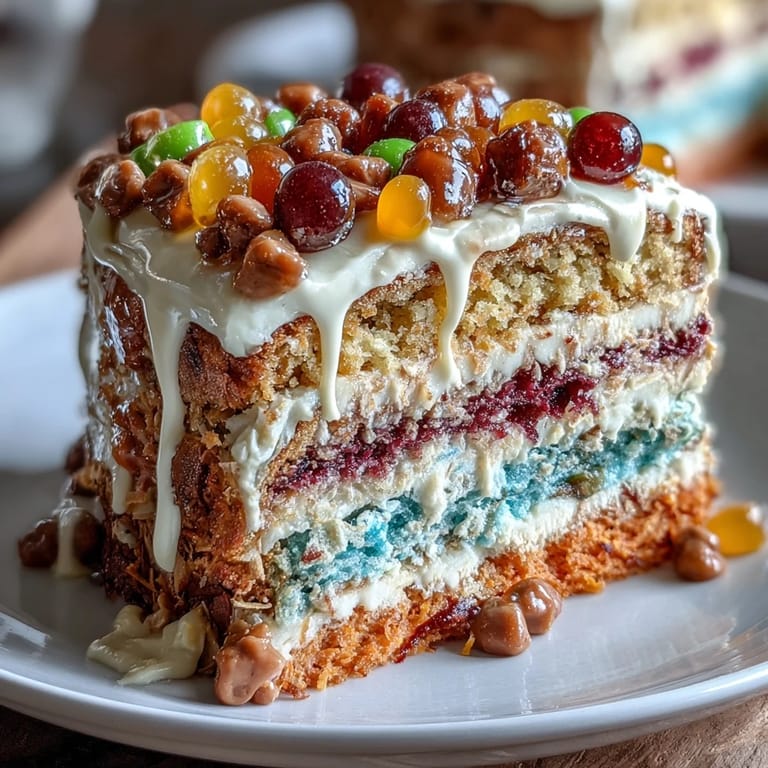
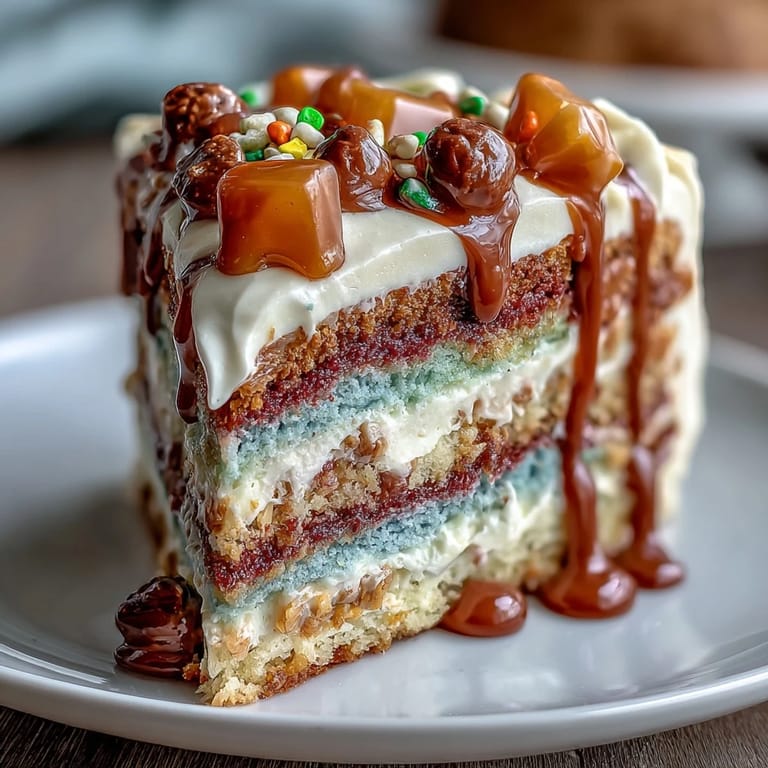
Save My daughter's eyes went wide when she saw the rainbow layers peek through the frosting, but the real magic happened when we sliced into it and candy tumbled out like a homemade piñata. That's when I realized this cake wasn't just dessert—it was theatre, surprise, and celebration all stacked together. For Cinco de Mayo that year, we skipped the store-bought cake entirely and made this one instead, and honestly, it became the moment everyone still talks about.
I'll never forget the kitchen chaos of my first attempt—flour everywhere, gel food coloring on my shirt, and six bowls of batter that looked like a paint palette. My partner walked in, took one look, and asked if we'd accidentally started an art project. By the time the layers came out of the oven, golden and perfect, we were both laughing so hard we almost forgot to let them cool.
Ingredients
- All-purpose flour: The foundation that holds those rainbow layers together without being fussy about technique.
- Baking powder and baking soda: This combo ensures the cake stays light and fluffy even with all the food coloring added.
- Unsalted butter and granulated sugar: Room temperature butter creams better and creates that fluffy crumb that makes each bite melt.
- Room temperature eggs: They blend smoothly into the batter and give the cake its tender structure.
- Gel food coloring: Never use liquid—it thins the batter and muddles the colors; gel gives you vivid, true hues.
- Assorted small candies: The surprise filling; stick to lightweight pieces like gummies and mini M&Ms, nothing that melts or gets heavy.
- Unsalted butter and powdered sugar for frosting: This ratio creates frosting that's spreadable and stable enough to hold up the layers without sliding.
Tired of Takeout? 🥡
Get 10 meals you can make faster than delivery arrives. Seriously.
One email. No spam. Unsubscribe anytime.
Instructions
- Prep your pans and oven:
- Grease and line three 8-inch round pans, then preheat to 350°F. This prevents sticking and makes release effortless.
- Build the dry mix:
- Whisk flour, baking powder, baking soda, and salt together in a medium bowl so everything distributes evenly through the batter.
- Cream the butter and sugar:
- Beat them together for about 3 minutes until the mixture looks pale and fluffy; this traps air and gives the cake its tender crumb. Stop and scrape the bowl halfway through.
- Incorporate eggs and vanilla:
- Add eggs one at a time, beating well after each addition so they fully blend in. This prevents a grainy texture.
- Alternate dry and wet ingredients:
- Add flour mixture and milk in three stages, starting and ending with dry ingredients. Mix just until combined—overmixing toughens the cake.
- Divide and color your batter:
- Split the batter into six bowls and add a different gel color to each one, stirring gently until the color is even and there are no streaks. The colors should be bold and vibrant.
- Bake the layers:
- If you only have three pans, you'll need to bake in batches. Each layer takes 15-18 minutes; they're done when a toothpick comes out clean and the tops spring back when lightly touched.
- Cool and prepare for assembly:
- Let layers cool in their pans for 10 minutes, then turn them out onto wire racks. Once completely cool, use a 3-inch round cutter to carefully cut a hole from the center of four layers, leaving the top and bottom layers whole.
- Make the frosting:
- Beat softened butter until creamy, then gradually add powdered sugar, milk, vanilla, and salt. Beat until smooth and fluffy, about 2-3 minutes.
- Assemble the cake:
- Place the first whole layer (purple, if following the order) on your serving plate and spread a thin layer of frosting on top. Stack the first cut-out layer and frost lightly, then repeat with the remaining cut-out layers.
- Add the candy surprise:
- Pour your assorted candies into the center cavity created by the stacked cut-out layers, filling it generously so every slice gets a surprise.
- Crown the cake:
- Place the final whole layer on top to seal in the candy treasure.
- Frost and decorate:
- Generously frost the outside and top of the cake with remaining frosting. Add colored frosting, sprinkles, or festive decorations to make it as vibrant as you want.
- Chill and slice:
- Refrigerate for at least 30 minutes before slicing so the layers hold together cleanly and the frosting sets. Slice slowly to reveal the candy piñata inside.
 Save
Save One of my favorite memories happened when my friend cut into her slice and candy spilled onto her plate—she actually squealed and said it was like a cake that gave you a gift. That's when I realized the real appeal of this cake: it turns a normal dessert moment into an actual event, something that makes people feel like they're part of something special.
The Rainbow Layer Strategy
The magic of this cake is that each layer needs to be a different color, so you're essentially making six mini batches from one base batter. I learned quickly that dividing the batter into bowls before adding color works way better than trying to color it all at once in the mixer. You get even color distribution and no streaks, which means every slice looks Instagram-worthy without any extra effort.
Choosing Your Piñata Filling
The candy filling is where you can have fun and make it your own, but there's a technique to it: avoid anything too heavy or sticky. I made the mistake once of adding large lollipops, and they poked through the layers like they were trying to escape. Stick to lightweight candies like gummies, mini M&Ms, and sprinkles—things that settle nicely in the center cavity without shifting or breaking through the frosting.
Making It Your Own
This cake is a blank canvas for creativity, so don't feel locked into the exact colors or decorations. I've made versions with different color orders, added edible glitter to the frosting, and even tinted the frosting itself to match the layers. The core technique—baking rainbow layers and hiding candy in the center—works with whatever vision you have.
- For a gluten-free version, swap the all-purpose flour for a 1:1 gluten-free flour blend and follow everything else exactly.
- Chill the assembled cake for at least 30 minutes before slicing so the layers stay intact and the frosting sets firmly.
- If you don't have a 3-inch round cutter, use a small bowl or glass to trace and cut the center circles by hand.
 Save
Save This cake has become my go-to for any celebration that needs a wow factor, and every single time someone cuts into it and finds candy, it feels like watching a gift unwrap itself. Make this for someone you care about, and you're not just serving dessert—you're creating a memory.
Recipe Questions & Answers
- → How do I achieve the vibrant rainbow colors?
Use gel food coloring for each batter portion to get bright, vivid layers without thinning the batter.
- → Can I prepare the layers ahead of time?
Yes, bake the layers a day before and wrap them to maintain moisture until assembly.
- → What is the best way to fill the candy center?
Cut out circles from four middle layers and stack them. Pour small candies into the cavity, then cover with whole top and bottom layers.
- → How should I store the finished cake?
Keep refrigerated in an airtight container to preserve freshness and firmness.
- → Can this cake be made gluten-free?
Yes, substitute all-purpose flour with a 1:1 gluten-free flour blend for similar results.